QAutomate userguide
QAutomate -Test Automation Pathfinder-
1 Getting started
1.1 Introduction
QAutomate offers a greatly versatile SW testing tool for designing, running automated tests in Web based platforms and extending tests with Python and Robot Framework libraries
1.1.1 Why QAutomate
User can keep their cost-effectiveness high while enabling maintenance for the test case scripts. QAutomate encapsulates a great selection of new solutions into a single test tool
- visual UI testing and verification
- production and development monitoring tool for end-user
- security testing
- appium and selenium webdriver
- functional testing
- extend test with Python and Robot libraries
- performance testing
- REST and SOAP API support
1.1.2 Who is it for
The user interface is developed keeping SW developers and test engineers need in mind. Visual Ui enables scripting without need to write any code
1.1.3 How does it work?
Use your web browser and QAutomate framework together to create page models from web page UI. Use page models and large function library for creating test scripts with Test Designer. Automatically run existing test cases
1.2 Copyright & licence
You may make copies of the Software as reasonably necessary for the use authorized above, solely for backup and/or archival purposes. No other copies shall be made. Each authorized copy must reproduce all copyright and other proprietary rights notices on or in the Software.
Ownership, Proprietary Rights and Protection
The Software and all rights, without limitation including Intellectual Property Rights therein, are owned by QAutomate, its affiliates and/or its licensors and are protected by international treaty provisions and all other applicable national laws of the country in which it is being used. QAutomate, its affiliates and its licensors shall retain all right, title and interest in and to the Software. The structure, organization, and code of the Software are the valuable trade secrets and confidential information of QAutomate, its affiliates and/or its licensors.
Licensee acknowledges and agrees that the Software constitutes and contains valuable Intellectual Property Rights of QAutomate, its affiliates and of its applicable licensors. Licensee will at all times recognize and act consistently with QAutomate’, its affiliates and its applicable licensors’ Intellectual Property Rights in the Software, regardless of whether patents have been issued thereon, and will not in any way act, or fail to act in any manner, to intentionally or negligently harm such Intellectual Property Rights.
Licensee shall not:
- use, copy, reproduce or transfer the Software or any copy, modification, or merged portion, in whole or in part, except as expressly provided for in this Agreement
- modify, alter, adapt, translate, reverse-engineer, decompile, disassemble or attempt to discover the source code, underlying ideas, algorithms, file formats or programming interfaces of the Software
- remove or cause to be removed any copyright, trademark, patent or any other proprietary legend or notices from any copy of the Software
- rent, lease, resell, lend, assign sub-license, or transfer the Software
- use the Software for any purposes the Software is not intended to.
2 Installation
2.1 Supported platforms and integrations
2.2 QAutomate Installation instructions
2.2.1 Installing preconditions
Before installing make sure to have
- administrator rights
- rights to write “C:\users\username\qautomate” - folder
- If Python is already installed make sure .py files are associated with Python. If not run following command from terminal:
1 | assoc .py=Python.file #works on Windows
|
2.2.2 Windows installation
- Download correct Windows installer file
Note
Select correct file based on Python version (32bit recommended/64bit)
- Double-click on “QAutomate-x.x.x-windows-official-development-release-build-#xxx.exe”
- Choose installation location. By default framework is installed to “C:\Python27\Lib\Site-packages\qautomate”
- Install all Python modules 2.2.4 Contents of installer and leave all installation options as default (recommended)
- Install at least Firefox browser for its used for testing by default (GC and IE also supported)
The user can also install QAutomate framework silently. Open terminal and navigate to folder containing installer file and execute
1 | QAutomate-x.x.x-windows-xxbit-official-development-release-build-#xxx.exe \S
|
After Installation
Confirm environmental variables and set if necessary
Environment variables PATH:
- “C:\Python27\Lib\site-packages\qautomate\webframework\resources”
- “C:\Program Files (x86)\Graphviz2.38\bin”
- to verify installation run verify_installation.py located in “C:\Users\username\qautomate”
- reboot computer
- to uninstall QAutomate use windows uninstall programs in Control Panel
Check list (installation problems)
Python is not recognized
-> check successful Python installation guide
QAutomate can not be started
no module named error
-> QAutomate can not find needed Python modules
-> check successful Python installation guide and pip install
can not connect license server
-> check network proxy and add that QAutomate settings file 2.6.2 Launching errors
Successfull Python installation
- check that Python is visible in Windows Add/Remove programs list
- check that Python can be found registry:
- e.g value C:\Python27\ in HKEY_LOCAL_MACHINE SOFTWARE\Wow6432Node\Python\PythonCore\2.7\InstallPath
- check that pip install works running cmd: “C:\Python27\Scripts\pip list”
Note
Python installer option should be: Install Python for all users
2.2.3 Linux installation (Ubuntu)
Ubuntu 16.04 has Python2.7.12
Download and unzip Linux64-bit installer file
Install following SW packages from unzipped folder
Ubuntu 16.04
1
$ ./install_full_environment_ubuntu1604.sholder Ubuntu versions
1
$ ./install_full_environment.sh
Note
If problems installing Python modules, run “$ sudo apt-get update”
Finalize installation by logging off computer and logging in to make sure that environment variables are loaded correctly.
- Environmental variable PYTHONPATH:
- “/home/user/.local/lib/python2.7/site-packages/qautomate”
- Environment variable PATH:
- “/home/user/.local/lib/python2.7/site-packages/qautomate/webframework/resources”
to uninstall QAutomate run in terminal
1
$ ./installer_lin.py remove
2.2.4 Contents of installer
Python + Python modules
| Software | ||
|---|---|---|
| Python2.7.12 | wxPython | graphviz |
These modules are installed via pip install
| Python modules | ||
|---|---|---|
| pillow | path | enum34 |
| Setuptools | pyasn1 | simplejson |
| pycparser | pygraphviz | pyOpenSSL |
| cffi | ipaddress | jira |
| idna | six | lxml |
| tlslite | request | pywin32 |
| xlrd | request-toolbelt | jdcal |
| oauthlib | openpyxl | cryptography |
2.3 Updating framework
There is three ways to update framework.
Update QAutomate framework from Starter Ui > help > Update QAutomate
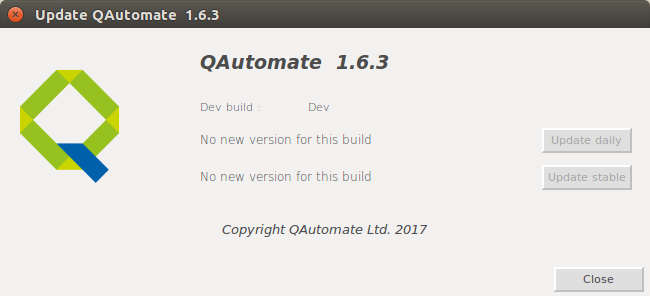
This method works on both OS.
Alternative ways to update QAutomate framework
Windows
Update installation from command prompts:
1
QAutomate-x.x.x-windows-xxbit-official-development-release-build-#xxx -UPDATE=TRUE
Full framework update including all the modules
Windows
- Download newest installer file
- Remove old install via control panel
- Follow 2.2.2 Windows installation guide to install newest version
Linux
- Download and unzip newest installer file
- run in terminal
1 | update_framework.sh
|
2.4 Updating web drivers
Update webdrivers and selenium from Starter Ui > help > Update WebDrivers
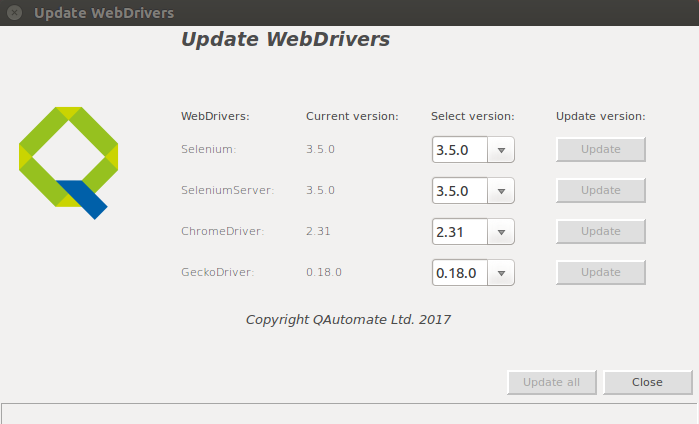
The user can also update webdrivers from command prompt:
webdrivers_updater.py
-gd desired Geckodriver version, e.g. -gd 0.19.1
-cd desired Chromedriver version, e.g. -cd 2.33
-ed desired Edgedriver version, e.g. -ed 15063
-id desired IEdriver version, e.g. -id 3.7
2.5 Appium installing instructions
Appium is an open-source tool for automating native, mobile web, and hybrid applications on iOS and Android platforms. Native apps are those written using the iOS or Android SDKs. Mobile web apps are web apps accessed using a mobile browser (Appium supports Safari on iOS and Chrome or the built-in ‘Browser’ app on Android). Hybrid apps have a wrapper around a “webview” – a native control that enables interaction with web content. Projects like Phonegap, make it easy to build apps using web technologies that are then bundled into a native wrapper, creating a hybrid app.
2.5.1 Appium installation preconditions
Android SDK is required along with Appium to run test on Android devices
Node.js is needed to running Appium. User can install it from https://nodejs.org/en/download/ if it doesn’t come with Appium installation.
Note
Java SE Development Kit 8 is needed to test latest Android apps
We recommend downloading Android Studio https://developer.android.com/studio/index.html
2.5.1.1 Windows Android Studio installation
- Launch the .exe file you downloaded.
- Follow the setup wizard to install Android Studio and any necessary SDK tools.
On some Windows systems, the launcher script does not find where the JDK is installed. If you encounter this problem, you need to set an environment variable indicating the correct location.
- Select Start menu > Computer > System Properties > Advanced System Properties. Then open Advanced tab > Environment Variables and add a new system variable JAVA_HOME that points to your JDK folder, for example “C:\Program Files\Java\jdk1.8.0_77”.
2.5.1.2 Linux Android Studio installation
Unpack the .zip file you downloaded to an appropriate location for your applications, such as within /usr/local/ for your user profile, or /opt/ for shared users.
To launch Android Studio, open a terminal, navigate to the android-studio/bin/ directory, and execute studio.sh.
-> Tip: Add android-studio/bin/ to your PATH environment variable so you can start Android Studio from any directory.
Select whether you want to import previous Android Studio settings or not, then click OK.
The Android Studio Setup Wizard guides you though the rest of the setup, which includes downloading Android SDK components that are required for development.
Note
User may need to install some 32-bit libraries with the following command:
1 | sudo apt-get install lib32z1 lib32ncurses5 lib32bz2-1.0 lib32stdc++6
|
2.5.2 Windows Appium installation
use npm install
1 | npm install -g appium
|
or
- Download Appium http://appium.io/
- Extract AppiumForWindows folder and execute appium-installer.exe
Note
Choose installation destination that doesn’t have spaces. Leaving other installation options as default is recommended
- Open framework_config.ini located in “C:\Python27\Lib\site-packages\qautomate\webframework\config” and set nodejs_path pointing to node.exe and appium_path pointing to installed appium folder for example “C:\Users\username\Appium\node_modules\appium”

2.5.2.1 Running Appium on windows
Preconditions
Make sure environment variables are set correctly:
- ANDROID_HOME=C:\Android\android-sdk
- Add “C:\Android\android-sdk\platform-tools” to path
Install .apk
Download .apk
Install .apk to emulator
1
adb install apkname.apk
Launch emulator or connect phone (USB debugging must be on)
Running Appium on windows
Launch Qautomate as an Android application
2.5.3 Linux Appium installation
Steps to get Appium working on Ubuntu:
Install ruby: Paste the below command at terminal and hit enter
1 | sudo apt-get install build-essential curl git m4 ruby texinfo libbz2-dev libcurl4-openssl-dev libexpat-dev libncurses-dev zlib1g-dev
|
Install linux brew: Paste the below command at terminal and hit enter
1 | ruby -e “$(curl -fsSL https://raw.githubusercontent.com/Homebrew/linuxbrew/go/install)”
|
set path for brew
Type: gedit .bashrc at terminal and copy paste following into the .bashrc file
1 2 3 | export PATH=”$HOME/.linuxbrew/bin:$PATH”
export MANPATH=”$HOME/.linuxbrew/share/man:$MANPATH”
export INFOPATH=”$HOME/.linuxbrew/share/info:$INFOPATH”
|
Install node: Paste the below commands one by one at terminal and hit enter
1 2 3 4 5 6 | brew update
brew install node
brew link node
Install appium
npm install -g appium
npm install wd
|
2.6 Launching tool
2.6.1 Launching tool for the first time (entering license)
Launch QAutomate starter UI by
double clicking Desktop shortcut (QAutomate.Ink)
using command prompt:
open terminal
navigate to the directory which is desired for saving all the files
run command:
1
qautostart.py
A license popup should appear
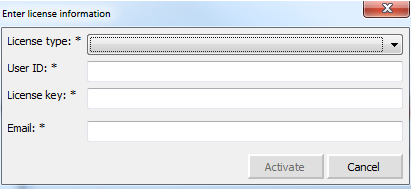
After entering license information, starter UI should be visible

Note
If framework fails to start because of web browser is missing update Selenium web driver 2.6.2 Launching errors
2.6.2 Launching errors
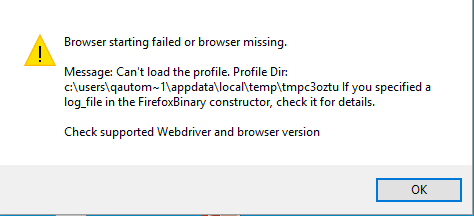
GeckoDriver
Since Selenium 3 does not have native implementation for a Gecko engine based Firefox browser, Geckodriver must be used in order to drive commands into the browser.
Geckodriver is an executable file that starts a server on your system. It is used as a proxy server between a W3C WebDriver-compatible client(your system) and a Gecko engine based browser. It translates commands into the Marionette automation protocol.
Marionette is a remote protocol of a Gecko/Firefox. It is a tool for remote controlling Gecko based platforms.
All Geckodriver and browser versions are not compatible together.
Update Selenium webdriver
After updating Mozilla Firefox or Google Chrome user may have to update Selenium webdriver also.
Update through webdriver update dialog 2.4 Updating web drivers or on windows execute following command in terminal
1 | C:\Python27\Scripts>pip install --upgrade selenium
|
Install specific Selenium version
e.g. Selenium version 3.5.0
1 | C:\Python27\scripts>pip install --upgrade selenium==3.5.0
|
Note
The user can also downgrade Selenium with this method
Install different GeckoDriver version
Different GeckoDriver versions can be downloaded through webdriver update dialog 2.4 Updating web drivers or from https://github.com/mozilla/geckodriver/releases
Proxy error
If network problems occurs when launching tool using team licence, please try defining proxy and port which to use:
Setting up proxy can be done in “C:\Users\username\qautomate\global_settings.xml”
As default proxy is empty and not used. Proxy should look like:
<proxy_name=”123.123.123.123:8080”/> for example
2.7 Example test project and working directory
We highly recommend running one of the example test found in “C:\Users\username\qautomate\example_tests” in order to check that the framework along with all required libraries has been installed properly. You can run example test by following steps below.
open terminal
change directory to “C:\Users\username\qautomate\example_tests\demo”
run command:
1
qautorunner.py -c Example_demo -b ff -p data\example_project_parameters\elements_demo_parameters.xmlThis starts Firefox and executes one test on the QAutomate demo page. Mozilla Firefox is used as default if no parameters has been provided. If user wish to use another browser, they can use -b parameter with one of the following browser indicator:
- “gc” for Google Chrome
- “op” for Opera
- “ie” for Internet Explorer
- “me” for Microsoft Edge
Test report is created in the following directory, where user can check test result by opening index.html “C:\Users\username\qautomate\example_tests\demo\test_reports”
Working directory

common_lib
- holds common library imports
data
- holds created test data inputs etc
pagemodel
- holds screenshots, .csv and autogenerated methods for page models
performance
- settings and methods for performance testing
profile
variables
- can be used to define python variables for e.g testing ui titles

test_reports
- holds test results
tests
- holds test cases
Project settings
project_settings.xml is used to configure project settings. For example tables containing over 140 elements or 25 rows are ignored during page model creation.
1 2 3 4 5 6 7 8 9 10 11 12 13 14 15 16 17 18 19 20 21 22 23 24 25 26 27 | <settings>
<xpath_type value="xpath-position"/>
<css_deep value="7"/>
<minimize_css value="False"/>
<project_proxy_ff value=""/>
<project_proxy_port value=""/>
<project_proxy_type value="0"/>
<project_proxy_type_protocol value="http"/>
<project_login value=""/>
<automated_methods value="True"/>
<canvas_modeling value="False"/>
<css_pattern pattern="" use="False"/>
<allow_non_unique_css_pattern value="False"/>
<pm_template template_string="" use="False"/>
<testability template_string="" use="False"/>
<table_filters element_count="140" row_count="25" use="True"/>
<big_element_filter height="40" width="55"/>
<contains_in_xpath value="False"/>
<default_area height="0" use="False" width="0" x="0" y="0"/>
<no_filtered_tags>
<tag name="button"/>
<tag name="select"/>
<tag name="strong"/>
<tag name="input"/>
<tag name="frame"/>
</no_filtered_tags>
</settings>
|
Browser configuration
QAutomate browser_config.xml defines browser specific settings and desired capabilities. Settings and desired capabilities can be modified in file.
Example browser_config.xml file:
1 2 3 4 5 6 7 8 9 10 11 12 13 14 15 16 17 18 19 20 21 22 23 24 25 26 27 28 29 30 31 32 33 34 35 36 37 38 39 40 41 42 43 44 45 46 47 48 49 50 51 52 53 54 55 56 57 58 59 60 61 62 63 64 65 66 67 | <browser_settings>
<default>
<browser name="Chrome">
<add_extension if_case="enable_live_monitoring">GlobalUtils._CHROME_CACHE_CLEANER</add_extension>
<add_experimental_option option="prefs">
{"intl.accept_languages": tue.get_country_key(get_config_value("browser_language"))}
</add_experimental_option>
<add_argument if_case="enable_precise_memory">"--enable-precise-memory-info"</add_argument>
<add_argument>"--start-maximized"</add_argument>
</browser>
<browser name="Firefox">
<set_preference if_case="use_ff_proxy" option="network.proxy.type">int(settings_parser._proxy_type)</set_preference>
<set_preference if_case="use_ff_proxy_type_1" option="network.proxy.http">"localhost"</set_preference>
<set_preference if_case="use_ff_proxy_type_1" option="network.proxy.http_port">3128</set_preference>
<set_preference if_case="use_ff_proxy_type_1" option="network.proxy.ssl">"localhost"</set_preference>
<set_preference if_case="use_ff_proxy_type_1" option="network.proxy.ssl_port">3128</set_preference>
<set_preference if_case="project_proxy_type_http" option="network.proxy.type">
int(settings_parser._project_proxy_type)
</set_preference>
<set_preference if_case="project_proxy_type_http" option="network.proxy.http">
settings_parser._project_proxy_ff
</set_preference>
<set_preference if_case="project_proxy_type_http" option="network.proxy.ssl">
settings_parser._project_proxy_ff
</set_preference>
<set_preference if_case="project_proxy_type_http" option="network.proxy.ssl_port">
int(settings_parser._project_proxy_port)
</set_preference>
<set_preference if_case="project_proxy_type_http" option="network.proxy.http_port">
int(settings_parser._project_proxy_port)
</set_preference>
<set_preference if_case="project_proxy_type_socks" option="network.proxy.type">
int(settings_parser._project_proxy_type)
</set_preference>
<set_preference if_case="project_proxy_type_socks" option="network.proxy.socks">
settings_parser._project_proxy_ff
</set_preference>
<set_preference if_case="project_proxy_type_socks" option="network.proxy.socks_port">
int(settings_parser._project_proxy_port)
</set_preference>
<set_preference if_case="project_proxy_type_socks" option="network.proxy.socks_version">5</set_preference>
<set_preference option="browser.download.folderList">2</set_preference>
<set_preference option="browser.download.manager.alertOnEXEOpen">False</set_preference>
<set_preference option="browser.helperApps.neverAsk.saveToDisk">
"application/msword, application/csv, application/ris, text/csv, image/png, application/pdf, text/html,
text/plain, application/zip, application/x-zip, application/x-zip-compressed, application/download,
application/octet-stream, application/xml"
</set_preference>
<set_preference option="browser.download.manager.showWhenStarting">False</set_preference>
<set_preference option="browser.download.manager.focusWhenStarting">False</set_preference>
<set_preference option="browser.download.useDownloadDir">True</set_preference>
<set_preference option="browser.helperApps.alwaysAsk.force">False</set_preference>
<set_preference option="browser.download.manager.alertOnEXEOpen">False</set_preference>
<set_preference option="browser.download.manager.closeWhenDone">True</set_preference>
<set_preference option="intl.accept_languages">
tue.get_country_key(get_config_value("browser_language"))
</set_preference>
<set_capabilities option="marionette">True</set_capabilities>
<set_capabilities option="acceptInsecureCerts">True</set_capabilities>
</browser>
<browser name="MicrosoftEdge">
<capabilities option="browserName">"MicrosoftEdge"</capabilities>
<capabilities option="version">""</capabilities>
<capabilities option="platform">"WINDOWS"</capabilities>
</browser>
</default>
</browser_settings>
|
Note
When using firefox version >47.0.2, capabilities option marionette should be True. When using firefox version 47.0.2 or under, capabilities option marionette should be False.
Working with Git repository
QAutomate projects can be handled as working directories. Page models need to be modelled only once per working directory. New models can be added/updated to project easily. Common way to handle modifications and new files is to use version control repository e.g Git.
Here is example of GIT ignore file content in working directory.
.gitignore
1 2 3 4 5 6 7 8 9 10 11 12 | *.py[co]
*.pyc
*.zip
generator*.png
screenshot*.png
*.old
__init__.pyc
test_reports
data/soap/debug/*
profile/last_failed_tc_profile.txt
used*.txt
geckodriver.log
|
3 Creating test cases
How to start QAutomate? See topic 2.6.1 Launching tool for the first time (entering license)
QAutomate UI consists of the following tabs:

Generator
- creates directory structure (if it doesn’t exist) and model of the website or desired area of page.
- creates screenshots and .csv files which are used later on with Designer
Designer
- visualizes all elements which can be used in page model
- allow user to create and edit methods for unknown elements
- create test case and test settings
- allows user to create an .xml file with parameters from input fields and then use the parameters in test flow creation
3.1 Introduction of making test cases with page model approach
QAutomate framework is built around so-called Page model approach commonly known as Page object pattern. The website is divided into logical parts of views. It can be a separate page or even a separate section of the page for example header, footer and content area. Each of these pages or certain section of the page are modelled to a specific class called page model which contains web-elements.
Benefits:
- website is modelled into logical pieces with clear interaction between them
- web elements are defined in one place -> easier maintenance if changes are done
- code reuse -> easier maintenance if changes are done
- functions have logical name providing shorter and more readable tests

3.2 Test case creation preconditions “Page models”
To model web page user have to navigate to desired web page by navigating to it with automatically opened browser window or copying link straight to QAutomate framework addressbar located in “Generator” tab and clicking “Go”. Preview image of the web page appears below addressbar. Filling input forms on the web page results in test data being created automatically.
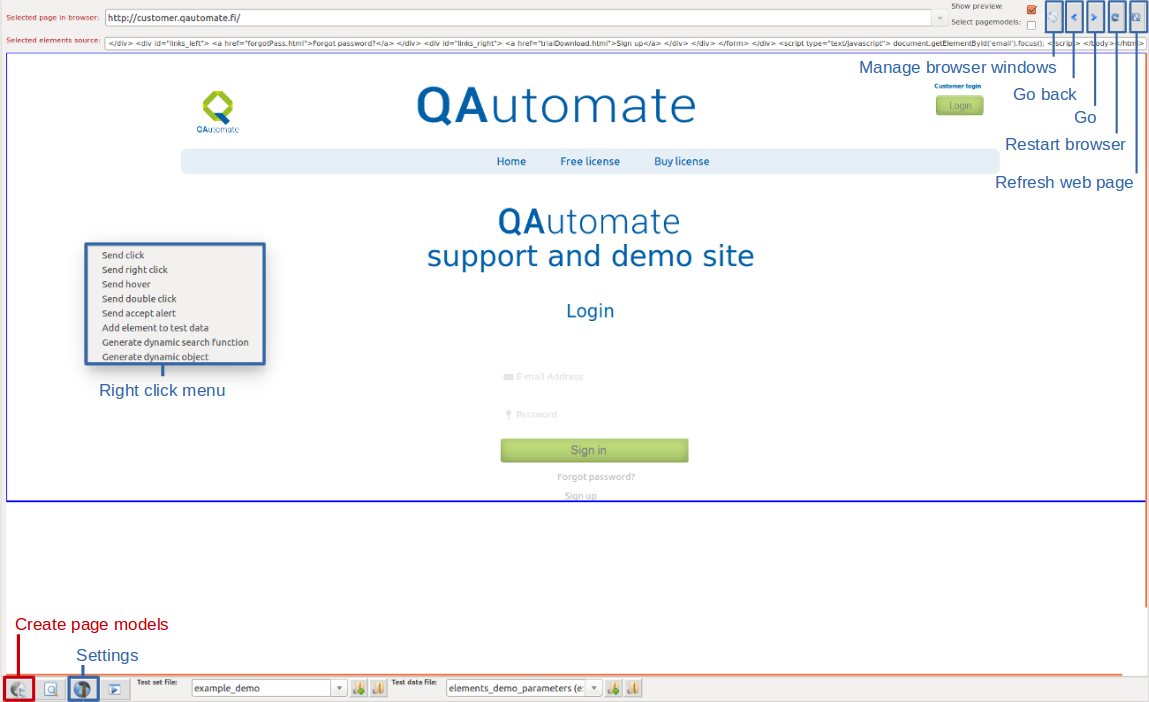
3.3 Test case building blocks “Page model methods”
The methods describing actions on web page receive logical names in order to easily interact with those in the code. The main idea of this approach is to store web elements and functions in one single place founded in “Designer” tab so the user only calls the functions from a particular page model depending on test scenario enabling easier maintenance.
Objects are listed in “Designer” tab and automatically generated methods associated with selected object are shown in “Method view” tab.
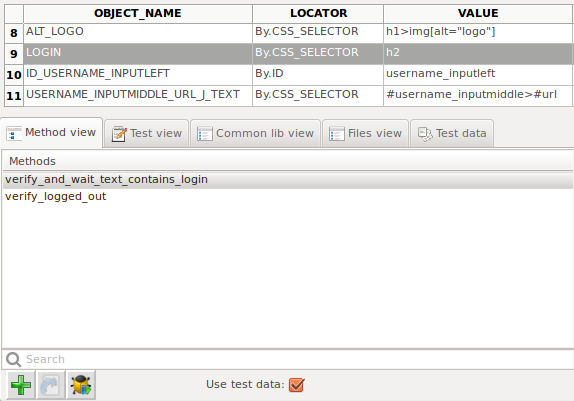
3.4 QAutomate auto-generated page model method
Auto-generated test methods means, that tool will analyze web page and generate basic methods to visible view. For example Login page, has usually login form or forgot password method. This can be used straightly for designing tests.
Auto-generated methods consists from three parts: Page modeling, Building test methods and test data collecting
Using Page modeling with auto-generated test methods:
- Generate page models
- Collect web elements information and analyze page structure
- Build test methods
- Analyze tool will generate methods from page resulting for links, image links, buttons, etc…
- Created test methods are instantly use in test Designer
- Form test automation
- Collect test data
- Collect test data from input elements and forms
- Save test data automatically to xml format
3.5 Creating basic test flow
Steps to create basic test flow:
- Create model(s) from web bage(s) 3.5.1 Preconditions - Page Modelling
- Choose existing test data file or create new one
- Create and name Test set file
- Create and name New test case
- Create test flow
3.5.1 Preconditions - Page Modelling
To model web page user needs to navigate to desired web page
- With browser window which opened with QAutomate framework or
- Copying www link to framework address bar and clicking “Go”
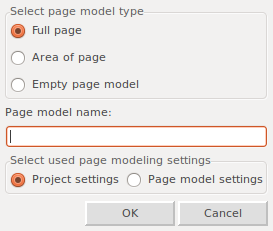
Click Create page model button and select
Full page model
- Models whole web page and all of its elements
Area of page
- Models selected area of page and elements inside it
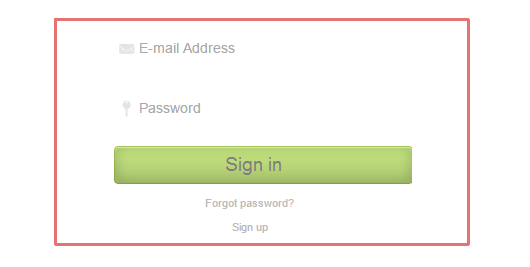
- Select area to model via left-click and drag over desired area or giving coordinates for desired area
- Red outlined box indicates selected area
- Click OK in bottom-right corner to continue
Empty page model
- Models empty page model
Give a logical name for the page model.
Modeling progress is shown in “Console output” under preview image.
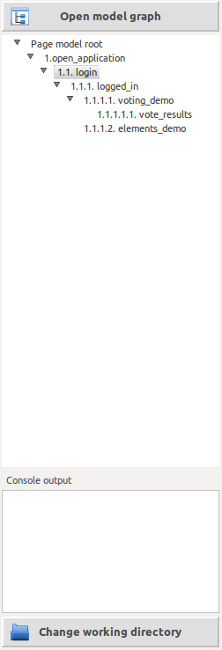
To create several page models repeat steps above. New page model appears under active page model on the left panel. Page models can be reorganized by drag and dropping.
Note
QAutomate Model Graph is generated based on page model structure
Example of Login.py
1 2 3 4 5 6 7 8 9 10 11 12 13 14 15 16 17 18 19 20 21 22 23 24 25 26 27 28 29 30 31 32 33 34 35 36 37 38 39 40 41 42 43 44 45 46 47 48 49 50 51 52 53 54 55 56 57 58 59 60 61 62 63 64 65 66 67 68 69 70 71 72 73 74 75 76 77 78 79 80 81 82 83 84 85 | # -*- coding: utf-8 -*-
# Example for using WebDriver object: driver = self.get_current_driver() e.g driver.current_url
from selenium.webdriver.common.by import By
from webframework.extension.util.common_utils import *
from webframework.extension.parsers.parameter_parser import get_parameter
from time import sleep
class Login(CommonUtils):
# Pagemodel timestamp: 20170509104311
# Pagemodel url: http://customer.qautomate.fi/
# Pagemodel area: Full screen
# Pagemodel screen resolution: (1600, 1200)
# Use project settings: True
# Used filters: default
# Xpath type: xpath-position
# Create automated methods: True
# Depth of css path: 7
# Minimize css selector: False
# Use css pattern: False
# Allow non unique css pattern: False
# Pagemodel template: False
# Use testability: False
# Use contains text in xpath: False
# Exclude dynamic table filter: True
# Row count: 25
# Element count: 140
# Big element filter width: 55
# Big element filter height: 40
# Not filtered elements: button, select, strong, input, frame
# Canvas modeling: False
# Pagemodel type: normal
# Links found: 5
# Page model constants:
FLOAT_LEFT_ALT_LOGO = (By.CSS_SELECTOR, u'a.floatLeft>img[alt="logo"]') # x: 241 y: 32 width: 92 height: 90,
tag: img, type: , name: None, form_id: , checkbox: , table_id: , href: http://www.qautomate.fi/
ID_LOGO_PIC = (By.ID, u'logo_pic') # x: 530 y: 32 width: 377 height: 80, tag: img, type: , name: None, form_id: ,
checkbox: , table_id: , href: None
LOGIN_CUSTOMER = (By.CSS_SELECTOR, u'p.login_header') # x: 1100 y: 40 width: 180 height: 10, tag: p, type: ,
name: None, form_id: , checkbox: , table_id: , href:
ALT_LOGIN = (By.CSS_SELECTOR, u'img[alt="Login"]') # x: 1208 y: 57 width: 75 height: 31, tag: img, type: ,
name: None, form_id: , checkbox: , table_id: , href: http://customer.qautomate.fi/login.html
HOME = (By.LINK_TEXT, u'Home') # x: 616 y: 140 width: 88 height: 40, tag: a, type: , name: None, form_id: ,
checkbox: , table_id: , href: http://www.qautomate.fi/
FREE_LICENSE = (By.LINK_TEXT, u'Free license') # x: 707 y: 140 width: 127 height: 40, tag: a, type: , name: None,
form_id: , checkbox: , table_id: , href: http://customer.qautomate.fi/trialDownload.html
BUY_LICENSE = (By.LINK_TEXT, u'Buy license') # x: 837 y: 140 width: 122 height: 40, tag: a, type: , name: None,
form_id: , checkbox: , table_id: , href: http://customer.qautomate.fi/buylicense.html
ALT_LOGO = (By.CSS_SELECTOR, u'h1>img[alt="logo"]') # x: 620 y: 223 width: 296 height: 50, tag: img, type: ,
name: None, form_id: , checkbox: , table_id: , href: None
LOGIN = (By.CSS_SELECTOR, u'h2') # x: 593 y: 362 width: 350 height: 28, tag: h2, type: , name: None,
form_id: j_spring_security_check, checkbox: , table_id: , href:
ID_USERNAME_INPUTLEFT = (By.ID, u'username_inputleft') # x: 618 y: 449 width: 12 height: 50, tag: div, type: ,
name: None, form_id: j_spring_security_check, checkbox: , table_id: , href:
USERNAME_INPUTMIDDLE_URL_J_TEXT = (By.CSS_SELECTOR, u'#username_inputmiddle>#url') # x: 630 y: 449 width: 297 height: 47,
tag: input, type: text, name: j_username, form_id: j_spring_security_check, checkbox: , table_id: , href:
ID_USERNAME_INPUTRIGHT = (By.ID, u'username_inputright') # x: 906 y: 449 width: 12 height: 50, tag: div, type: ,
name: None, form_id: j_spring_security_check, checkbox: , table_id: , href:
ID_USER_PIC = (By.ID, u'user_pic') # x: 630 y: 468 width: 26 height: 10, tag: img, type: , name: None,
form_id: j_spring_security_check, checkbox: , table_id: , href: None
ID_PASSWORD_INPUTLEFT = (By.ID, u'password_inputleft') # x: 618 y: 509 width: 12 height: 50, tag: div, type: ,
name: None, form_id: j_spring_security_check, checkbox: , table_id: , href:
PASSWORD_INPUTMIDDLE_URL_J = (By.CSS_SELECTOR, u'#password_inputmiddle>#url') # x: 630 y: 509 width: 297 height: 47,
tag: input, type: password, name: j_password, form_id: j_spring_security_check, checkbox: , table_id: , href:
ID_PASSWORD_PIC = (By.ID, u'password_pic') # x: 633 y: 524 width: 9 height: 17, tag: img, type: , name: None,
form_id: j_spring_security_check, checkbox: , table_id: , href: None
ID_SUBMIT = (By.ID, u'submit') # x: 624 y: 569 width: 299 height: 41, tag: input, type: image, name: None,
form_id: j_spring_security_check, checkbox: , table_id: , href:
FORGOT_PASSWORD = (By.LINK_TEXT, u'Forgot password?') # x: 715 y: 621 width: 96 height: 13, tag: a, type: ,
name: None, form_id: j_spring_security_check, checkbox: , table_id: , href: http://customer.qautomate.fi/forgotPass.html
SIGN_UP = (By.LINK_TEXT, u'Sign up') # x: 738 y: 648 width: 40 height: 13, tag: a, type: , name: None,
form_id: j_spring_security_check, checkbox: , table_id: , href: http://customer.qautomate.fi/trialDownload.html
def click_img_link_id_logo_pic(self):
# AutoGen method click_link: None
self.click_element(self.ID_LOGO_PIC)
def wait_sync_img_link_id_logo_pic(self):
# AutoGen method wait sync link: None
self.wait_until_element_is_visible(self.ID_LOGO_PIC)
def login(self):
# AutoGen methods form: j_spring_security_check
self.input_text(self.USERNAME_INPUTMIDDLE_URL_J_TEXT, parameters['j_username'])
self.input_text(self.PASSWORD_INPUTMIDDLE_URL_J, parameters['j_password'])
self.click_element(self.ID_SUBMIT)
|
3.5.1.1 Handling pages with frames
If web pages contains frames QAutomate framework detects it before page modeling.
Framework alerts the user about frames on web pages
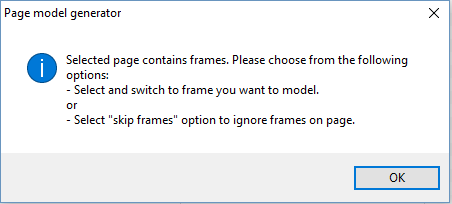
The user have to choose what to model

Check skip frames option to ignore frames in page modeling
Select frame from dropdown menu to model frame content elements
- Select frame content - Switches frame content area
- Select frame url - Handles frame as normal web page url
Click Create page model, select Full page model and give name for page model.
After frame is modeled click Return to default content -button to continue page modeling.
3.5.2 Page model settings filter

3.5.3 Dynamic objects
Dynamic tables and lists
By default dynamic tables holding over 25 rows or 140 elements are filtered out of modelled elements
3.5.3.1 Custom locators
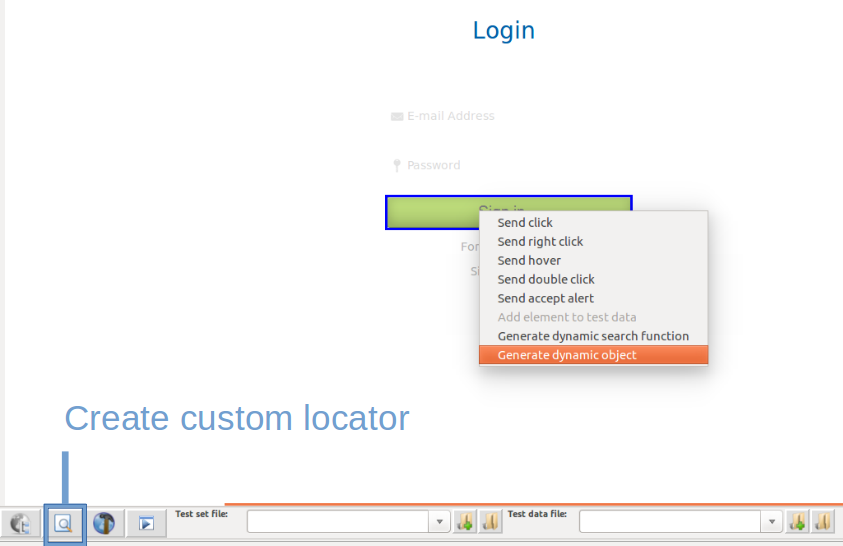
Dynamic objects allow user to add elements on already modelled pages, e.g. element(s) not found in modelling progress.
Start creating dynamic objects by right-clicking an object in generator view and select Generate dynamic object or by clicking Create custom locator-button
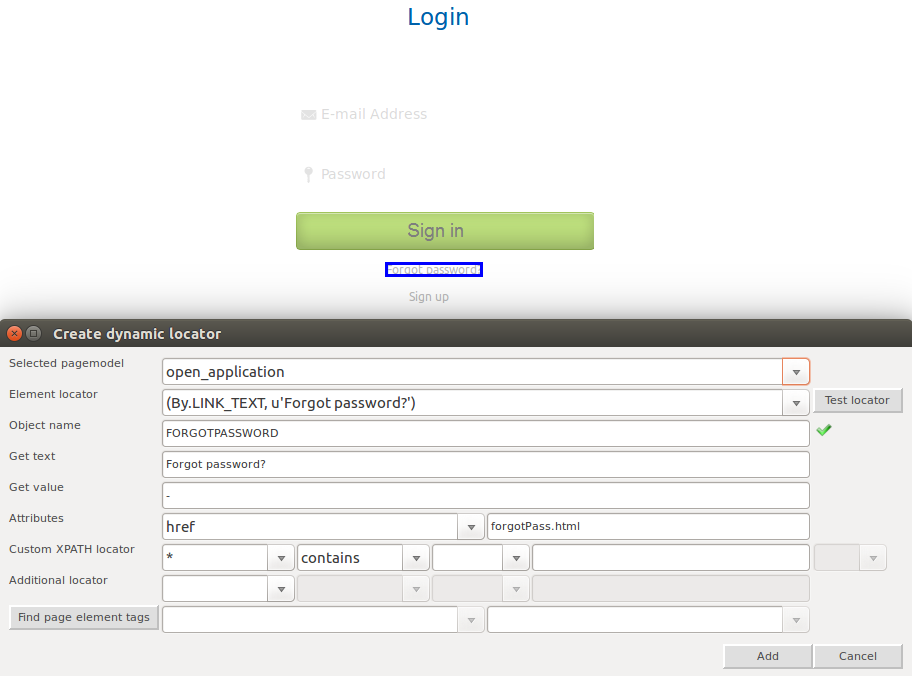
Get text, Get value and Attributes field show info about currently selected element.
There is two ways to add new dynamic object
- Customize own xpath locator
- Search elements by tags and select desired element from dropdown list
Test custom locator before adding it.
Create custom locator xpath finding element with specific details:
Example with specific element:
1 | self.find_element((By.ID, "my_element_name_id"))
|
or
Example with dynamic element locator:
1 2 3 | row_variable = 2
custom_locator = "//tr[row_varible]/div[3]"
self.find_element((By.XPATH, custom_locator)
|
Add click_element to custom locator example:
1 | self.click_element(self.find_element((By.ID, "my_element_name_id")))
|
3.5.3.2 Dynamic tables and lists
Dynamic tables and lists should be handled with dynamic methods which works with dynamic content. Static locators should not be used.
QAutomate has functionality which analyzes structures and makes dynamic methods. This will make it easier to handle tables and lists in tests.
Right click top of Generator preview window and select option “Generate dynamic search function”.
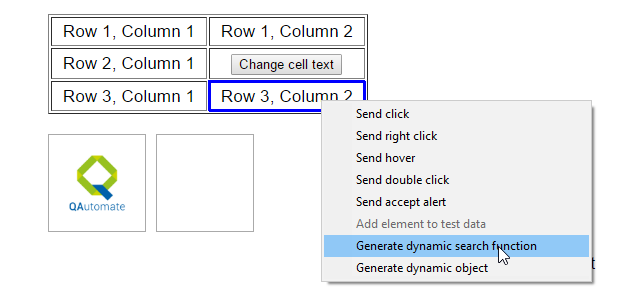
After clicking you can set search options:
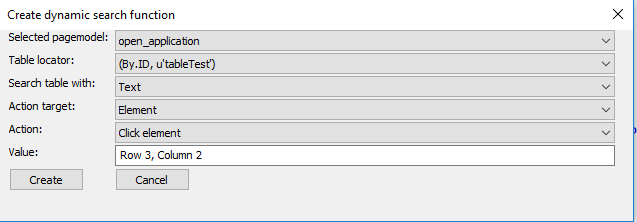
Dynamic search function examples:
Example of Clicking and finding table element with text or text contains.
1 2 3 4 5 6 7 8 9 10 11 12 13 14 15 16 17 18 | def click_element_from_table_tableTest_1(self, text=u'Row 3, Column 2'): #text_contains = u'w 3, Column 2'
# Element search
locator = self.TABLETEST
value = text
#value = text_contains
row = u'TBODY/TR'
cell = u'TD'
element_info = self.get_table_column_and_row_by_text(locator, value, row, cell)
#element_info = self.get_table_column_and_row_by_text_contains(locator, value, row, cell)
# Searched element info
row_number = element_info[2]
column_number = element_info[3]
row_element = element_info[0]
element = element_info[1]
# Action for the element
self.click_element(element)
|
Example of getting element text from certain row.
1 2 3 4 5 6 7 8 9 10 11 12 13 14 15 16 | def get_text_from_table_tableTest_1(self, text_contains=u'Row 3'):
# Element search
locator = self.TABLETEST
value = text_contains
row = u'TBODY/TR'
cell = u'TD'
element_info = self.get_table_column_and_row_by_text_contains(locator, value, row, cell)
# Searched element info
row_number = element_info[2]
column_number = element_info[3]-1
row_element = element_info[0]
element = row_element.find_elements(By.XPATH, cell)[int(column_number)-1]
# Action for the element
return element.text
|
Example of find list row and clicking arrow element.

1 2 3 4 5 6 7 8 9 10 11 12 13 14 15 | def click_element_from_list_1(self, text=u'11:33'):
# Element search
locator = self.SEARCH_TABLE
value = text
row = u'LI'
cell = u'DIV'
element_info = self.get_list_row_by_text_contains(locator, value, row, cell)
# Searched element info
row_number = element_info[1]
row_element = element_info[0]
element = row_element.find_elements(By.CLASS_NAME, u'vr-icon-arrow_right')[0]
# Action for the element
self.click_element(element)
|
3.6 Test flow creation
After all necessary pages are modelled move to “Designer” tab and again to “Test view” tab.
Test flow creation steps:
- Create test set file
- Create test case
- Select or create test data file
3.6.1 Starting test flow creation
Create a new test set file by clicking Create test set file - button.
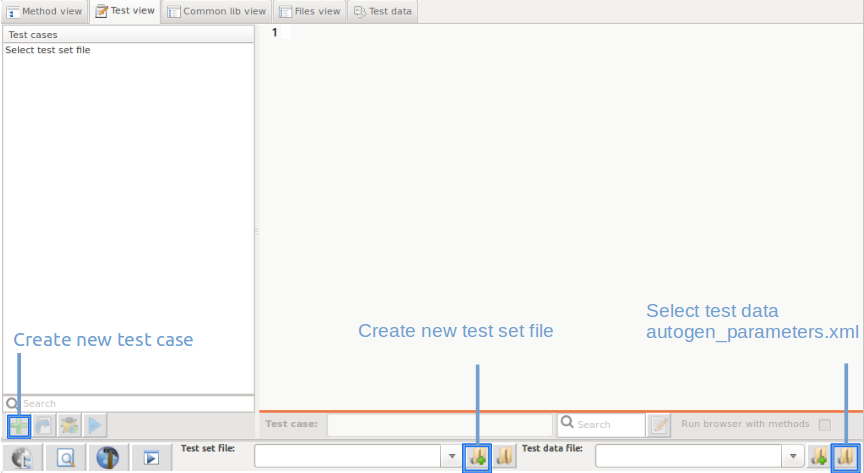
If user uses QAutomate designer to create test scripts all necessary imports are imported automatically contrary to using some other code editor.
After test set file is created user have to create test case by clicking New test case - button (see picture below). Name and startup URL must be given for test case.

After test case is created test case, setup and teardown is presented in the left column in Test view -window, and script editor right next to it.

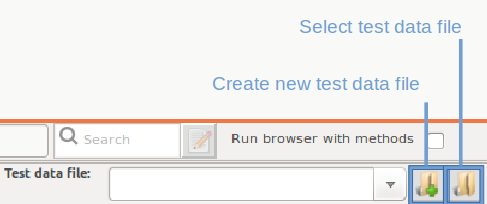
Select auto-generated test data file or create new test data file.
3.6.2 Setup and teardown
QAutomate Framework has similar test setup and teardown functionality as many other test automation frameworks. In short, the test setup is something that is executed before the test case, and the test teardown is executed after the test case. In QAutomate Framework setups and teardowns are just normal keywords with possible arguments.
The test teardown is special in two ways. First of all, it is executed also when the test case fails, so it can be used for clean-up activities that must be done regardless of the test case status. In addition, all the keywords in the teardown are also executed even if test executes successfully.
Test Setup and test Teardown is generated automatically after test case is created. The easiest way to specify the setup or the teardown for test set is modifying the files in “Test view” tab.
Example of setup executed before test case
1 2 3 | def setUp(self):
#Title Login to customer site
self.open_application.open_application_url(u'http://customer.qautomate.fi/')
|
Example of teardown executed after test case
1 2 3 4 | def tearDown(self):
if (self.customer_logged.wait_sync_img_link_alt_logout() == True):
#Step Click img link alt logout #Webpage: customer_logged
self.customer_logged.click_img_link_alt_logout()
|
Example of test set setup which is executed only once in the beginning of the test set
1 2 3 4 | @classmethod
def setUpTestSet(self):
print "Setupset"
self.open_application.open_application_url(u'http://customer.qautomate.fi/')
|
Example of test set teardown which is executed only once in the end of the test set
1 2 3 | @classmethod
def tearDownTestSet(self):
print "Teardownset"
|
3.6.3.1 Insert methods
There is four ways to add already defined methods to test case when test editing is enabled:
Double-clicking on element in preview image. If element have several methods framework adds autogenerated method
Right-clicking element on preview image
- The user can select the method to insert

Using hotkey under editing test case/component, see 8.1 Hotkeys
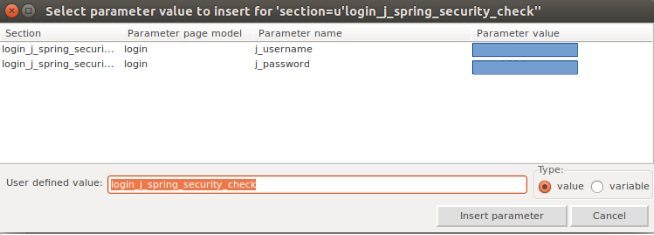
Clicking “Insert method” -button, see picture below.
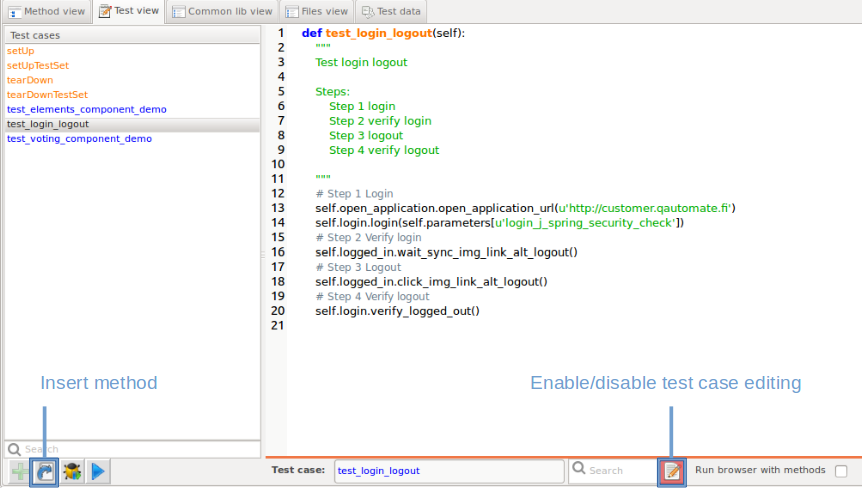
Choose method to insert from the method list. Filters and search can be used to find method. Click OK when correct method is selected.
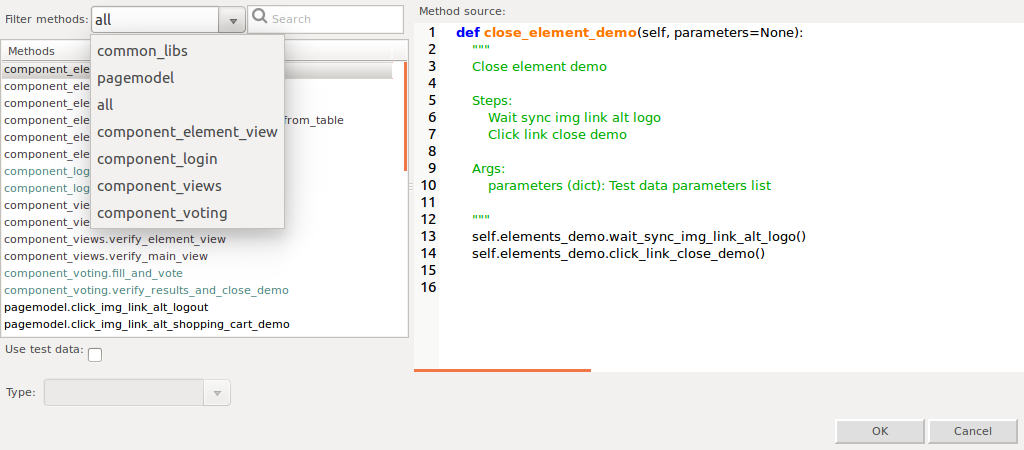
Select correct test data.
3.6.3.2 New methods
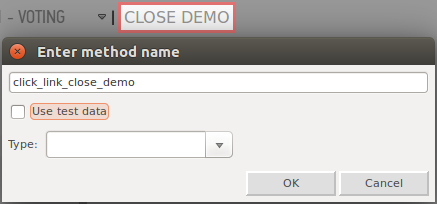
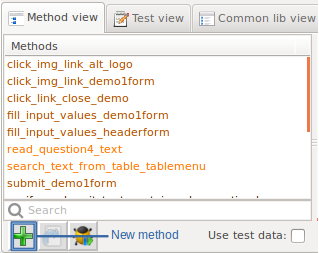
New methods can be defined by right-clicking preview image or by clicking “green plus”-button in “Method view” tab
Test data is asked for new method, if there is none click Cancel and define method in Method editor

3.6.3.3 Inserting steps on Page model level
Steps can be inserted into selected method by right-clicking preview image in “Method view” tab when method editing is enabled. Check help -> documentation > Classes > Class members to see how step methods are defined.
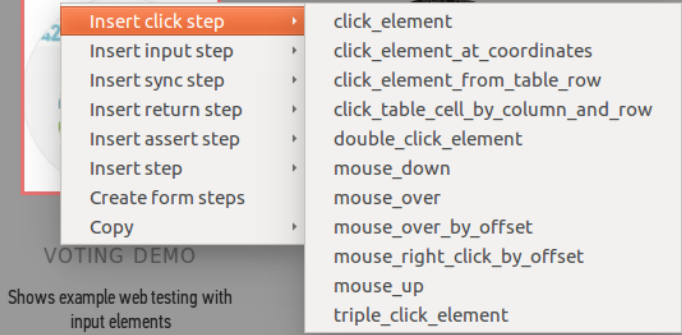
- Insert click step holds steps that clicks element
- Insert input step holds steps that input value e.g “select_checkbox”
- Insert sync step holds synchronized steps for element and for pages e.g. “wait_until_page_contains”
- Insert return step holds steps that returns a value
- Insert assert step holds verifying steps e.g. “element_should_be_visible”
- Insert step holds general steps that are not included in any particular category
3.6.3.4 Common lib methods
Common lib view-tab provides two options for creating common lib functions: component and common_lib.
Components are recommended way of using common lib methods. Multiple methods can be used in component for better test case level readability.
1 2 | def test_voting_component_demo(self):
self.component_login.login_customer(u'login_j_spring_security_check')
|
E.g component_login consists of following methods:
1 2 3 4 5 | def login_customer(self, section=u'login_j_spring_security_check'):
self.open_application.open_application_url(u'http://customer.qautomate.fi')
self.login.input_text(self.USERNAME_INPUTMIDDLE_URL_J_TEXT, parameters['j_username'])
self.login.input_text(self.PASSWORD_INPUTMIDDLE_URL_J, parameters['j_password'])
self.login.click_element(self.ID_SUBMIT)
|
User can define functions which are used outside of test case level by selecting common_lib instead of component.
For example if user wants to print newest file from some directory
1 2 3 4 5 6 | def get_newest_file(self):
import subprocess
import os
import glob
newest_file = max(glob.iglob('C:\Users\Niko\Downloads\*.exe'), key=os.path.getctime)
print newest_file
|
Note
Debugging methods and components is described in chapter 6.1.3.2 Method debug run
3.6.3.5 Run real-time browser methods in test flow creation
While “Run browser with methods” is checked inserted methods are tested simultaneously in browser in background. Green bar appears under preview image if method works correctly, red bar indicates error with inserted method.

3.6.4 Creating and using test data
autogen_parameters.xml holds test data in one single place and it’s generated automatically. E.g.

Test data is gathered by filling inputs before page modeling and data is divided into sections. Easiest way to use test data on test case level is to use insert methods descriped in chapter 3.6.3.1 Insert methods when all the necessary imports are gathered automatically.
Example of test_data.xml
1 2 3 4 5 6 7 8 9 10 11 12 13 14 15 16 17 18 19 20 21 22 23 24 | <?xml version="1.0" encoding="utf-8"?>
<TestData>
<Section name="login_j_spring_security_check">
<parameter name="j_username" pagemodel="login" value="*******"/>
<parameter name="j_password" pagemodel="login" value="*******"/>
</Section>
<Section name="verify_login_j_spring_security_check">
<parameter name="j_username" pagemodel="login" value="*******"/>
<parameter name="j_password" pagemodel="login" value="*******"/>
</Section>
<Section name="voting_demo_headerForm">
<parameter pagemodel="voting_demo" name="menuItems" value="DEMO 1 - VOTING"/>
</Section>
<Section name="voting_demo_demo1form">
<parameter pagemodel="voting_demo" name="favFramework1" value="unchecked"/>
<parameter pagemodel="voting_demo" name="favFramework2" value="checked"/>
<parameter pagemodel="voting_demo" name="favFramework3" value="unchecked"/>
<parameter pagemodel="voting_demo" name="favFramework4" value="unchecked"/>
<parameter pagemodel="voting_demo" name="radiobutton1" value="checked"/>
<parameter pagemodel="voting_demo" name="radiobutton2" value="unchecked"/>
<parameter pagemodel="voting_demo" name="question" value="good"/>
<parameter pagemodel="voting_demo" name="dropdown" value="Singapore"/>
</Section>
</TestData>
|
The user can also hardcode test scripts noticing that imports must be hardcoded as well.
-> add_dynamic_content_to_parameters
dynamic variables
- If user wants to e.g. read a value to a variable and use it later during the test set
Test data structure
Test data is parsed from xml-file into TESTDATA-dict. TESTDATA-dict contains key and value pairs. Keys hold names of sections e.g u’vote_results_verify_text. Value associated with key contains another dict. That dict contains key : value pairs e.g u’p_class_votingdemolabel : Vote results.
Check testdata class documentation from here.
Different ways to access testdata sections and parameters:
1 2 3 4 | TESTDATA.get_section("section")
TESTDATA.get_parameter("section", "parameter")
TESTDATA.get_section("section").get_parameter("parameter")
TESTDATA["section"]["parameter"]
|
Different ways to make sections and parameters to testdata:
1 2 3 4 | TESTDATA.create_section("section")
TESTDATA.create_parameter("section", "parameter")
TESTDATA.create_section("section").create_parameter("parameter")
TESTDATA["section"].create_parameter("parameter")
|
Copy testdata section:
1 | TESTDATA.copy_section("section", "section2")
|
Add testdata file:
1 | TESTDATA.add_testdata_file("file")
|
Example what TESTDATA-dict can contain:
1 2 3 4 5 6 7 8 9 10 11 12 13 14 15 16 17 18 19 20 21 22 | #Check what sections TESTDATA have
for section in TESTDATA:
print section
#Prints sections:
vote_results_verify_text
vote_results_headerForm
elements_demo_headerForm
voting_demo_demo1form
logged_in_verify_text
voting_demo_verify_text
login_j_spring_security_check
elements_demo_model
login_verify_text
voting_demo_headerForm
elements_demo_verify_text
#Check what parameters section have (TESTDATA[u'section name'])
print TESTDATA[u'login_j_spring_security_check']
#Prints
{u'j_username': u'**********', u'j_password': u'*******'}
|
Accessing specific value:
1 2 | #TESTDATA[u'section name'][u'parameter name']
TESTDATA[u'login_j_spring_security_check'][u'j_username']
|
3.6.4.1 Using parameters on page model level
1 2 3 | #method
def verify_username_exists(self, parameters=None):
self.element_text_should_be(self.LOGIN_TESTER_QAUTOMATE_FI, parameters[u'j_username'])
|
3.6.4.2 Using parameters on component level
If component uses only one section, parameters passed to called function can be referred to as section instead of full section name.
1 2 3 4 | def open_voting_view(self, section=u'login_j_spring_security_check'):
self.logged_in.wait_until_element_is_visible_login_tester_qautomate_fi()
self.logged_in.verify_username_exists(TESTDATA[section])
self.logged_in.click_img_link_alt_voting_demo()
|
3.6.4.3 Using parameters on test case level
Full section names must be used when multiple different sections are used in same e.g test case.
1 2 3 4 5 6 7 8 9 10 11 12 | #test case
def test_voting_component_demo(self):
# Step 1 Login
self.component_login.login_customer(u'login_j_spring_security_check')
# Step 2 Open voting
self.component_views.open_voting_view(u'login_j_spring_security_check')
# Step 3 Fill and vote
self.component_voting.fill_and_vote(u'voting_demo_demo1form')
# Step 4 Verify results
self.component_voting.verify_results_and_close_demo(u'voting_demo_demo1form')
# Step 5 Logout
self.component_login.customer_logout()
|
3.7 Creating advanced test cases
List of most common problems the user may face creating test flow.
3.7.1 Branches and conditions
The user can use methods and hardcode as conditions for e.g. if - else statements and for -loops
3.7.1.1 If statements
1 2 3 4 5 6 7 | if (self.elements_demo.testi() == 'True'):
#Step Click link close demo #Webpage: elements_demo
self.elements_demo.click_link_close_demo()
#Step Click img link alt logout #Webpage: customer_logged
self.customer_logged.click_img_link_alt_logout()
else:
print 'element is not visible'
|
3.7.1.2 For loops
1 2 3 4 | for i in range(5):
#Step New window #Webpage: elements_demo
self.elements_demo.new_window()
n+=1
|
3.7.1.3 Is object visible
1 2 | def wait_sync_img_link_alt_logout(self, parameters=None):
self.wait_until_element_is_visible(self.ALT_LOGOUT)
|
waits until selected object is visible before continuing test
3.7.1.4 Switching window and frames
- iframe
1 2 | def your_function(self, parameters=none):
self.select_frame((By.CSS_SELECTOR,u'.....'))
|
- new window
1 2 | def your_function(self, parameters=none)
self.select_window(self.click_element, self.OBJECT_NAME)
|
return to previous window
- method editing enabled right-click preview image -> insert step -> close_window_and_focus_to_previous
3.7.1.5 Visual verification of elements and areas
Compare screenshot area
- create new method
- right-click on preview image > insert step > compare_screenshots
- choose area by clicking mouse and dragging over desired area or manually inputting coordinates
- red outlined box indicates selected area -> Click OK
- select similarity level and give a name to reference screenshot
- insert method to test case
1 2 | def your_compare_method(self, parameters=None):
self.compare_screenshots(u'test')
|
Compare screenshot element
1 | self.elements_demo.compare_element_screenshots_alt_logo(u'reference_logo')
|
3.7.1.6 Alerts
The user have to deal with alerts when they appear for selenium to continue. Here’s how to deal with Javasript alerts.
Accept alert
1 2 3 4 | def click_element_id_confirmalertbtn(self):
self.click_element(self.ID_CONFIRMALERTBTN)
sleep(2)
self.accept_alert()
|
Dismiss alert
1 2 3 4 | def click_element_id_confirmalertbtn(self):
self.click_element(self.ID_CONFIRMALERTBTN)
sleep(2)
self.dismiss_alert()
|
3.7.1.7 Js memory measurement
Get js memory heap
1 2 3 4 5 6 7 8 9 | def test_js_memory_measurement(self):
self.elements.wait_for_visible_class_demoselect()
measurement_name = "element_demo_memory_" + self.common_utils.get_timestamp()
#click Open pad element button 15 times closing popup after every click
for _ in range(0, 15):
self.elements.click_value_open_pad_element()
self.elements.click_class_close()
#get_js_memory_heap works only with Google Chrome
self.common_utils.get_js_memory_heap(measurement_name)
|
3.7.1.8 Sync steps
For example click_element
1 2 3 | self.wait_until_element_is_visible(self.ID_SIMPLEALERTBTN)
self.wait_until_element_is_enabled(self.ID_SIMPLEALERTBTN)
self.wait_until_element_is_clickable(self.ID_SIMPLEALERTBTN)
|
In some cases it’s handy to put test to sleep e.g. to wait frame content to load
1 | sleep(time_in_seconds)
|
3.7.1.9 Webdriver methods
Selenium methods can be used with webdriver methods
1 2 3 | def login(self, parameters=None):
driver = self.get_current_driver()
driver.get("http://customer.qautomate.fi")
|
3.7.1.10 Other most common steps
Random option from dropdown
1 2 | def select_random_option_from_dropdown_example(self, parameters=None):
self.select_from_list_by_random_option(self.ID_DROPDOWN)
|
Select text from dropdown
1 2 | def select_text_from_dropdown_example(self, parameters=None):
self.select_from_list_by_label(self.ID_DROPDOWN, u'simple selection')
|
3.7.2 Add test documentation comment to test step
1 2 | #Title Login to customer site
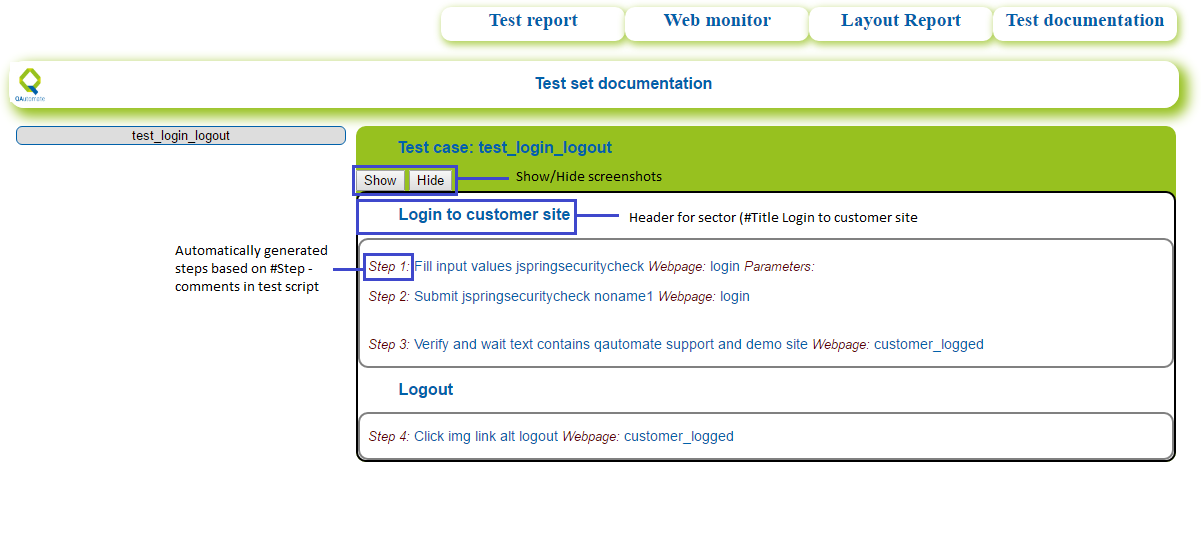
#Step Fill input values jspringsecuritycheck #Webpage: login #Parameters:
|
- Title gives a name for test Step or Section e.g. Login
- Step incicates method’s name
- Webpage indicates webpage the method is used on
- Parameters indicates if parameters are used on test case level
- Steps are generated automatically if user uses integrated methods to add functions to test scripts
- Steps can also be hardcoded
see 6.3.3 Generated test documentation to see how it works
3.7.3 Failing test case on purpose
Action: Fails test case
on page model level
1 2 3 4 5 | #Method
def function(self, parameters=none)
test_variable = 5
if(test_variable == 5):
self.fail(u'text_to_print')
|
on test case level
1 2 | #Test case level
self.common_utils.fail(u'text_to_print')
|
3.7.4 Add warning to test step
Action: Adds warning to test report
on page model level
1 2 3 4 5 | #Method
def function(self, parameters=none)
test_variable = 5
if(test_variable == 5):
self.warning(u'text_to_print')
|
on test case level
1 2 | #Test case level
self.common_utils.warning(u'text_to_print')
|
3.7.5 Drag and dropping elements
1 | self.drag_and_drop(self.ID_DRAG1, self.ID_DRAGDIV2)
|
Drag and dropping on htlm5 webpages
1 | self.drag_and_drop_html5(self.ID_DRAG1, self.ID_DRAGDIV2)
|
3.8 Validation and Boundary testing
Validation / Boundary testing purpose is test valid and invalid input data(negative testing). Basic idea is to design one test flow which is used to generate different test scenarios based on defined rules. Add “Validation” comment to test case row which function is filling the input fields:
Example test flow adding validation comment (# Validation):
1 2 3 | #Test case level
self.open_application.open_application_url(u'https://www.address.com')
self.registe_form.fill_input_values_register(TESTDATA[u'register_data']) # Validation
|
Element validation type defines the rules which is used for generated test combinations.
Define element validation type in test data xml:
validation field possible values: (check more detailed documentation in class documentation)
Common_utils validation support functions:
- digit(minvalue=1,maxvalue=20) (1234)
- alpha(minlength=1,maxlength=20)( (a-z, A-Z)
- alpha_lower(minlength=1,maxlength=20) (a-z)
- alpha_upper(minlength=1,maxlength=20) (A-Z)
- alphadigit(minlength=1,maxlength=20) (a-z, A-Z, 123456789)
- alphadigitchar(minlength=1,maxlength=20) (A-Z, 123456789, @£${[]}..)
- tel(minlength=1,maxlength=20) (telephone formats)
- email() (my_mail@mail.com)
- date_now_daymonthyear() (20.9.2016)
- date_past_daymonthyear() (19.9.2016)
- date_future_daymonthyear() (21.9.2016)
- [‘option_one’, ‘option_two’, ‘option_three’]
- {‘valid_key’:’value’}
- required()
- optional()
Define element verification type in test data xml:
verify field possible values:
Keys: type, value, position, case
Usage of key type:
If not defined, default type is type=’function’
type:’id’ Adds verify step that element is visible, define Selenium element locator by id
Example:
type:’locator’ Adds verify step that element is visible, define Selenium element locator by tuple
Example:
type:’element’ Adds verify step that element is visible, define Selenium element locator with using page models
Example:
type:’text’ Adds verify step that page contains text, define text string to search
Example:
type:’function’ Adds verify step, User given function
Example:
Usage of key Value:
- Mandatory field, must be defined
Usage of key Position:
- if not defined, Adds verify step after validation row to test case
- position:’end’ Adds verify step to end of test case
- position:’my_string’ Adds verify step after search match string
Case: Examples:
- if not defined, Adds verify step to every test case
- case:’invalid_min’ Adds verify step to every test case which matches search pattern
Example: case:
- ‘test_case_demo’ Adds verify step to every test case which matches search pattern
Format examples with validation and verify
Validation takes functions, list and dict with separated mark “;”
Validation example: function1();function2();[‘list_item’];{‘valid_key’:’value’}
1 | e.g. validation="digit(minvalue=0, maxvalue=99);required();['option_one', 'option_two', 'option_three'];{'valid_key':'value'}"
|
Verify takes python dicts with separated mark “;”
Verify example: function1();function2();[‘list_item’];{valid_key:’value’}
1 | e.g. verify="{type:'text',value:'Amount is wrong format',position:'end',case:'invalid_min'};{type:'text',value:'Amount is wrong format2'}"
|
Example defined test data xml with validation and verify:
1 2 3 4 5 6 7 8 9 10 11 12 13 14 | <Section name="register_data">
<parameter name="date_register" pagemodel="registe_form" validation="date_now_daymonthyear()" value="19.09.2016"
verify="{type:'text',case:'invalid_min',value:'date must be smaller',position:'end'};
{type:'text',case:'invalid_max',value:'date must be greater',position:'end'}"/>
<parameter name="amount" pagemodel="registe_form" validation="digit(minvalue=0, maxvalue=99);required()" value="1"
verify="{type:'text',value='Amount is wrong format',position:'end'}"/>
<parameter name="salary" pagemodel="registe_form" validation="digit(minvalue=1, maxvalue=100000)" value="1000"
verify="{type:'text',value:'Numeric format only',position:'end'}"/>
<parameter name="extra_salary" pagemodel="registe_form" validation="digit(minvalue=1, maxvalue=10000)" value="200"
verify="{type:'text',value:'No letters',position:'end'}"/>
<parameter name="extra_income" pagemodel="registe_form" validation="digit(minvalue=1, maxvalue=10)" value="2000"
verify="{type:'text',value:'Numeric format only',position:'end'}"/>
<parameter name="status" pagemodel="registe_form" validation="['choose','single','married','other']" value="married"/>
</Section>
|
Generate validation tests by right-clicking top of test case in test view and choose “Generate validation tests”
3.9 Page model maintenance
There is two ways to maintain page models:
- active maintenance
- manual maintenance
3.9.1 Active page model maintenance
To maintain pages actively while running test cases check “Active page model maintenance” in test runner UI.
- pages are modelled at the beginning of the test case and compared to previous models for differences
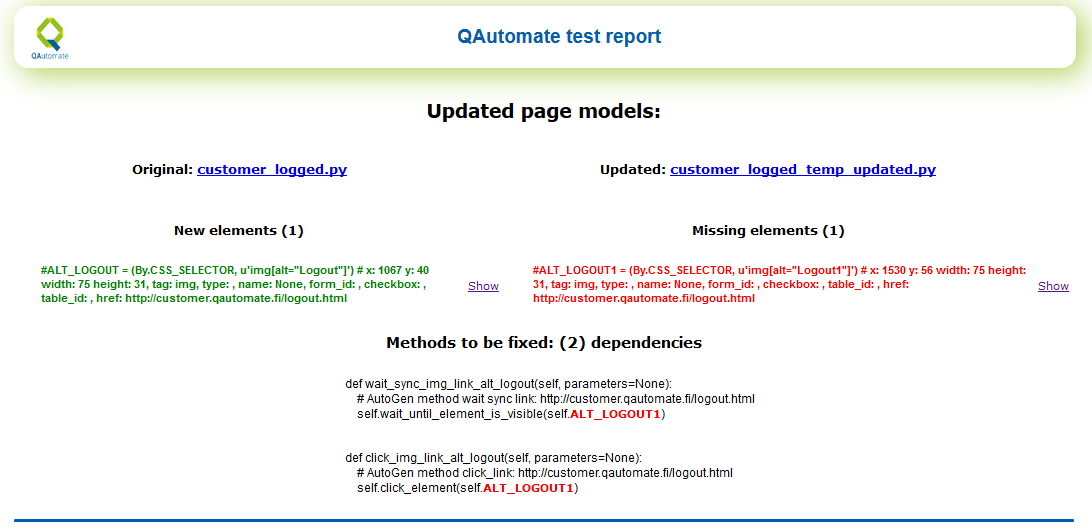
Elements can be replaced by clicking “Replace” -button in maintenance -tab.

New and missing elements are presented after test execution in “Page model comparison report” QAutomate framework takes screenshots from changed elements and puts green color overlay on new elements and red for missing ones.
After test is executed elements can be upgraded from “Maintenance” tab by clicking Replace -button.
3.9.2 Manual page model maintenance
If page models are updated or if they’re constantly changing user can update models including new methods and screenshots from “Maintenance” tab.

Click “select page models” to select page model to be updated and click “Start updating”.
Page model updating progress is shown in Console output window and after update is done new and missing elements are visible at bottom section of QAutomate window.

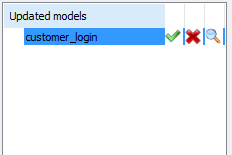
From top-right corner user can either:
- Accept update by clicking green checkmark
- Decline update by clicking red cross
3.10 QAutomate advanced features
3.10.2 Screenshot manager
- allows user to create or update screenshots
5.3 Security testing
5.3.1 Passive security testing
Download ZAProxy UI from https://github.com/zaproxy/zaproxy/wiki/Downloads and install it to C:\
Launch Zaproxy UI and disable the APi key and change local proxy to port 8092
Open terminal in “C:\Python27\scripts” and execute
1
pip install python-owasp-zap-v2Open zab.bat located in installation folder and add to end of zap.bat file
1
2
3
cd\
cd ZedAttackProxy
java %jvmopts% -jar zap-2.5.0.jar %*
zap.bat should look like
1
2
3
4
5
6
7
8
if exist "%HOMEPATH%\OWASP ZAP\.ZAP_JVM.properties" (
   set /p jvmopts=< "%HOMEPATH%\OWASP ZAP\.ZAP_JVM.properties"
) else (
   set jvmopts=-Xmx512m
)
cd\
cd ZedAttackProxy
java %jvmopts% -jar zap-2.5.0.jar %*
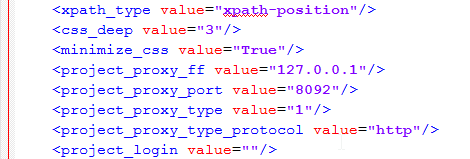
Open project_settings.xml located in the root of the working directory and make the following changes
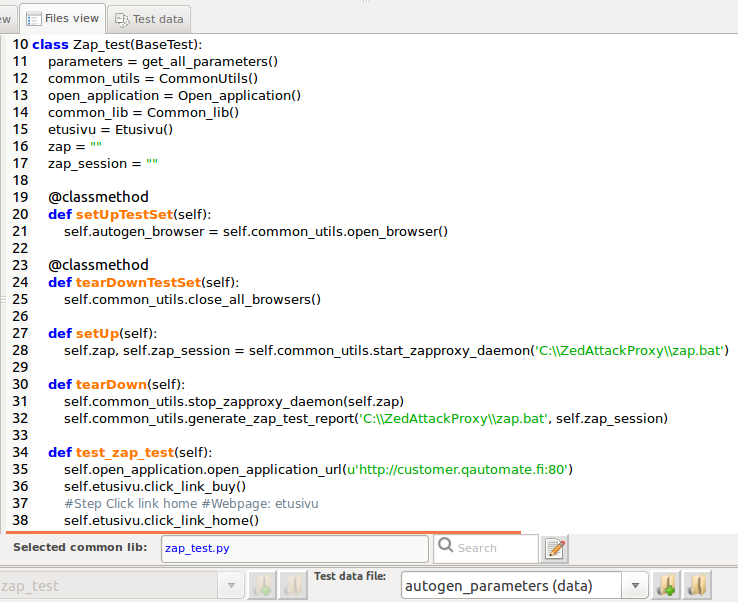
Script test file e.g.
Run test(s)
Test result is created automatically to qautomate_zap_report.html located in working_directory/test_reports
6 Test execution and test results
6.1 Test execution
6.1.1 Test execution with test runner UI

Select tests to run by clicking Load tests from files-button and select test data for test by clicking select test data file-button.

6.1.2 Execution with designer
- Test run is started by clicking the blue play button called “Execute test run” located left to test case name:
- New Browser window opens and defined test run automatically.
User can follow test progress from browser and “Test execution log” window. Report pops up in default browser. It’s generated automatically after execution in test_reports folder.
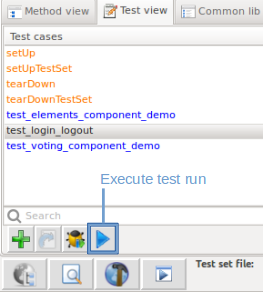
6.1.3 Execution with designer debug run
6.1.3.1 Test debug run
Go to Designer-tab and select Test view. Select desired test and click Execute debug run.
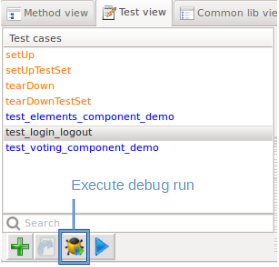
6.1.3.2 Method debug run
It is possible to debug single component or method.
- Generator/browser must have corresponding url with tested method e.g Login page must be selected while debugging login component.
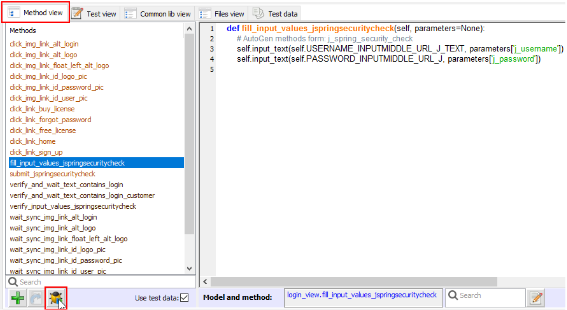
Page model method debug run
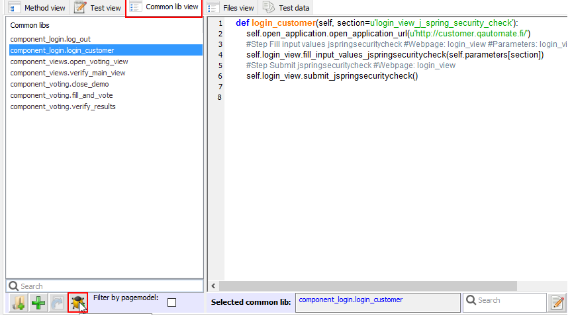
Component debug run
6.1.4 Test Execution in command line
Test can be executed from the terminal. The user needs to navigate to the directory where they have stored the tests and run the following command in CMD:
1 | qautorunner.py [options]
|
- [options]: This is the place where the test run parameters are defined. See topic 6.1.5 Test Execution options for test execution options
6.1.5 Test Execution options
Mandatory parameters
It is mandatory to define which tests are desired to be run. It can be done in two ways:
Define a class name or multiple class names directly in the command line.
c (–class_name) Defines the test class or test script to run.
1
2
3
qautorunner.py -c Example_demo -p data\\example_project_parameters\\elements_demo_parameters.xml
qautorunner.py -c Example_demo.test_login_logout -p data\\example_project_parameters\\elements_demo_parameters.xml
qautorunner.py -c Example_demo.test_login_logout=2 -p data\\example_project_parameters\\elements_demo_parameters.xml
Where Example_demo is a class name inside example_demo.py module. The last example runs “test_login_logout” script from “Example_demo” class twice.
Example test use testdata to login in to website. To run examples add -p (–parameter_file) which defines .xml file with parameters which can be used as test data.
Define a profile. It is a .txt file with the list of test classes and/or test scripts. An example can be found in \example_tests\demo\profile\
e (–execution_profile) Defines profile that determines which cases to execute. The path to the file can be relative to the test directory or absolute.
1
2
qautorunner.py -e profile\\example_demo_profile.txt
qautorunner.py -e c:\\test_project\\profile\\example_demo_profile.txt
It is the most convenient way to run the test set. The user can create different profiles depending on what set of tests they need to run.
Note
The user can use either -c or -e parameter at one time.
Optional parameters
The optional parameters listed below have default values which are defined in C:\Python27\Lib\site-packages\qautomate\webframework\config\framework_config.ini. The default settings can be seen in section “Default config file”.
The user may create his own config file to redefine the desired settings and run the tests solely with this file.
f (–framework_config_file) Defines test run execution settings and combines all the optional settings above (except -p). The user may create their own config file to redefine the desired settings.
- qautorunner.py -c Demotestset -f c:\test_project\config\my_config.ini
- Alternatively, the user can change one or more parameters for a given test execution in the command line.
b (–browser_name) Defines the browser which is used in test execution. The default browser is Firefox.
- qautorunner.py -c Demotestset -b gc
- Available options: ff (Mozilla Firefox), gc (Google Chrome), ie (Internet Explorer), me (Microsoft Edge), op (Opera), aa (Android application), ac (Android Chrome)
l (–browser_language) Defines webpage locale selection. Currently only Finnish and English country codes are supported.
- qautorunner.py -c Demotestset -l Finnish
t (–default_timeout) Defines default timeout used in tests. The default timeout is the time of how long Selenium waits to interact with page elements (for example, wait_for_visible, wait_for_value etc.).
- Give default_timeout in sec, e.g. 10
- The default value is 20 seconds.
- qautorunner.py -c Demotestset -t 10
v (–video_recording) To use a video recording with codecs ogg
- qautorunner.py -c Demotestset -v ogg
s (–static_testcase_folder) Use the static directory for test case reports.
- qautorunner.py -c Demotestset -s
r (–reporting_folder) Defines the location of test results.
- Enter test reports’ root directory either as a full path or relative to the current working directory.
- The default value is ‘test_reports’ directory at the same level from where the test was run.
- qautorunner.py -c Demotestset -r test_reports
a (–attachment_log) Give external log file path with name
- qautorunner.py -c Demotestset -a c:\temp\my_server_log.txt
rc (–remote_control) Give remote server address e.g http://127.0.0.1:4444/wd/hub
- qautorunner.py -c Demotestset -rc http://127.0.0.1:4444/wd/hub
cap (–desired_caps) Give desired capabilities e.g. ‘browserName=firefox,version=3.6,platform=LINUX’
- qautorunner.py -c Demotestset -rc http://127.0.0.1:4444/wd/hub -cap browserName=firefox,version=3.6,platform=LINUX
ib (–ignore_bad_flags) Ignore deprecated Chrome browser execution flags
- qautorunner.py -c Demotestset -rc http://127.0.0.1:4444/wd/hub -ib
pm (–new_model_on_error) Activate page model maintenance on error
- qautorunner.py -c Demotestset -rc http://127.0.0.1:4444/wd/hub -pm
bopt (–browser_options) Only Chrome browser. Sets browsers command line switches. There can be multiple switches separated with comma.
- qautorunner.py -c Demotestset -b gc -bopt incognito,start-fullscreen
p (–parameter_file) Defines .xml file with parameters which can be used as test data. A relative or full path to the file has to be provided
- qautorunner.py -c Demotestset -p c:\test_project\data\my_parameters.xml
- Create test data file .xml/.csv in the test cases location.
- For more details on using test data xml refer to 3.6.4 Creating and using test data
6.1.6 Selenium Grid remote webdriver
Remote webdriver configuration steps:
Download selenium-server-standalone.jar from http://www.seleniumhq.org/download/ or via webdriver updater
Launch Selenium Grid Hub from command line
1
java -jar selenium-server-standalone-3.5.0.jar -role hub- view status of the hub http://<ip_address>:4444/grid/console
Launch Selenium Grid Node from command line
1
java -jar selenium-server-standalone-3.5.0.jar -role node -hub http://<ip_address>:4444/grid/registerExecute qautorunner.py with -rc parameter to use remote webdriver
1
2
qautorunner.py -e path_to_profile/my_profile.txt -p path_to_parameters/my_parameters.xml -b ff -s -pm
   -rc http://<ip_of_server>:4444/wd/hub
Argument -cap can be used to modify browser capabilities.
1
2
qautorunner.py -e path_to_profile/my_profile.txt -p path_to_parameters/my_parameters.xml -b ff -s -pm
   -rc http://<ip_of_server>:4444/wd/hub -cap platform=LINUX,browserName=firefox
Note
Selenium Grid and WebDriver version differences might cause issues. Check browser version and corresponding webdriver compatibility e.g Firefox and Geckodriver.
6.1.7 BrowserStack
It is possible to run tests for multiple platforms and browsers using BrowserStack.
6.1.7.1 Testing public sites
- Get browserstack account to run tests
- Provide your own user_name and browser_stack_hash_key, which are needed for test execution
- Provide your desired capabilities browser = IE, firefox
- Execute test using command line:
1 2 | qautorunner.py -c New_test_set -p data\\autogen_parameters.xml -rc http://user_name:browser_stack_hash_key@hub.browserstack.com:80/wd/hub
-cap browser=IE,browser_version=11.0,os=Windows,os_version=10
|
6.1.7.2 Testing private sites
- Get browserstack account to run tests
- Provide your own user_name and browser_stack_hash_key, which are needed for test execution
- Provide your desired capabilities browser = IE, firefox
- Get browserstack local testing module
- Get browserstack local from https://www.browserstack.com/local-testing
- Run browserstack.exe with your own hash_key
- Execute test using command line:
1 2 | qautorunner.py -c New_test_set -p data\\autogen_parameters.xml -rc http://user_name:browser_stack_hash_key@hub.browserstack.com:80/wd/hub
-cap browser=IE,browser_version=11.0,os=Windows,os_version=10.browserstack.local=True
|
6.3 Test results
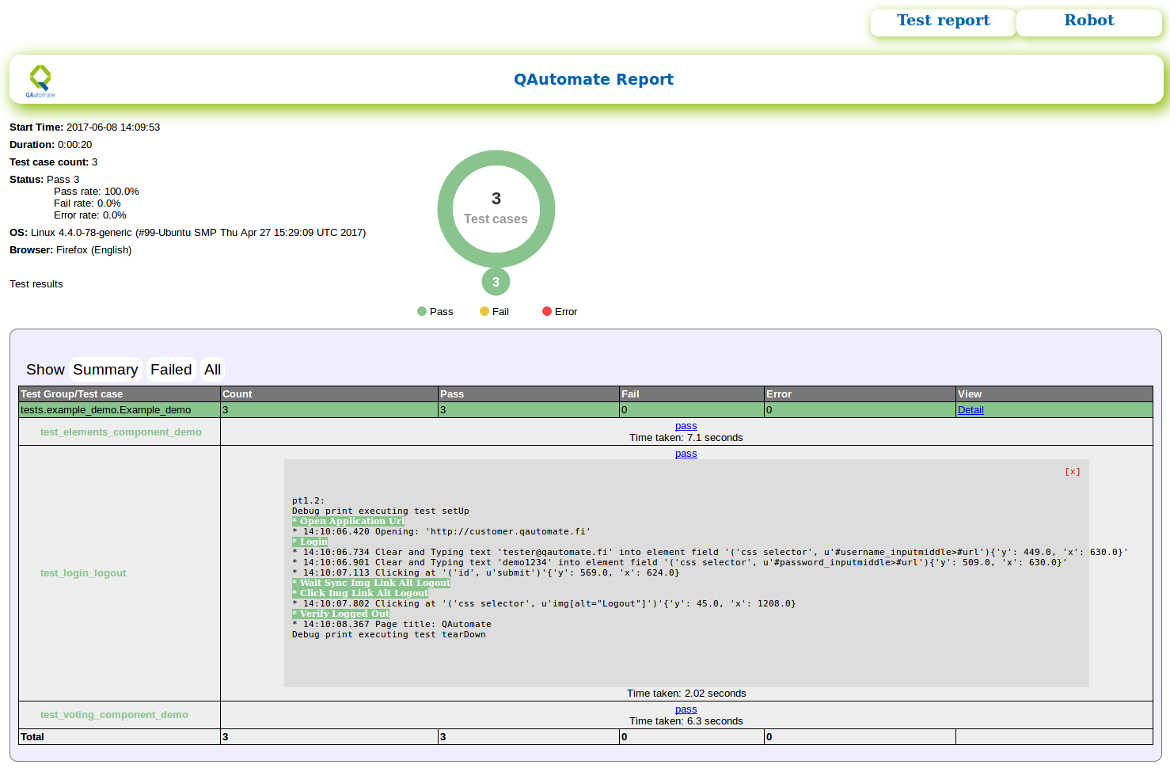
6.3.1 HTML test results
After execution test report is created in “working directory/test_reports/index.html” and it’s opened automatically in default browser 6.3 Test results
6.3.2 Junit XML test results
QAutomate test results is also documented in JUnit XML format if user wants to e.g. take advantage of Jenkins’ test reporting capabilities.
- XML formatted test result document is generated automatically in
- ../WorkingDirectory/test_reports/TEST-unittest.suite.TestSuite.xml
6.3.3 Generated test documentation
Click “Test Documentation” located in top-right corner to see step by step documentation for test set
See topic 3.7.2 Add test documentation comment to test step how steps and sections are generated
7 Extending QAutomate framework
7.1 Creating test libraries
Modules in Python are simply Python files with the .py extension, which implement a set of functions. Modules are imported from other modules using the import command.
Writing modules
Writing Python modules is very simple. To create a module of your own, simply create a new .py file with the module name, and then import it using the Python file name (without the .py extension).
Writing packages (‘libraries’)
Packages are namespaces which contain multiple packages and modules themselves. They are simply directories which MUST contain a special file called “__init__.py”. This file can be empty, and it indicates that the directory it contains is a Python package, so it can be imported the same way a module can be imported.
7.2 Using Robot framework libraries
Install Robot framework by executing following command in terminal
1
Python -m pip install robotframeworkOnce installed open QAutomate framework and navigate to “Test set view” in Designer -tab.
Click “Edit test set” and “Import external library” and select library to import or write e.g. “from robot.libraries.Lib-to-import import Telnet # external” to import Telnet
7.3 Using Python libraries
Check out the full list of built-in modules in the Python standard library here. The first time a module is loaded into a running Python script, it is initialized by executing the code in the module once. If another module in your code imports the same module again, it will not be loaded twice but once only - so local variables inside the module act as a “singleton” - they are initialized only once.
There is two ways to import a module
Hardcoding import command in Test set view when test set editing enabled
or using “Import external library”
- Navigate to Test set view -tab and enable test set editing by clicking “Edit test set”
- Import wanted Python library by clicking
7.4 Jenkins - Set up Continuous Integration
Jenkins provides continuous integration services for software development. It is a server-based system running in a servlet container
Applications which should be installed on a machine with Jenkins installed:
- QAutomate framework
- All applications and packages which come with QAutomate installer
- Jenkins (http://jenkins-ci.org/)
There are few plugins that are needed to install to use Jenkins with QAutomate properly.
Click Manage Jenkins
Click Manage Plugins
Select Available page
Plugins user need to install:
- GIT Plugin
- HTML Publisher Plugin
- JUnit Realtime Test Reporter Plugin
- Plot Plugin
- Performance Plugin
7.4.1 Setting up Jenkins on Windows
Installation on Windows
Download jenkins.war from jenkins.io and move the file to C:/Jenkins
open terminal in c:/Jenkins and execute
1
2
java -jar jenkins.war
-Dhudson.model.DirectoryBrowserSupport.CSP=
After Jenkins servlet has started navigate to localhost:8080 on your web browser.
Install Jenkins using recommended plugins for installation and install following plugins via Manage Jenkins > Manage Plugins
- GIT Plugin
- HTML Publisher Plugin
- JUnit Realtime Test Reporter Plugin
- Plot Plugin
- Performance Plugin
Job configuration on Jenkins:
Obtain latest source code
Execute tests with “qautorunner.py”
Recommendation: Read help for “qautorunner.py”:
1
qautorunner.py -h
Publish test results
Job creation example:
Go to Jenkins web page default: “http://localhost:8080”
Configure the created job:
Obtain the latest source code:
Note
If the user has their project source code on a remote machine, they can use the VCS and Source Code Management section to get the latest source code from a remote repository. We have Jenkins server on the same machine as our project, so we just copy source code from our project directory(‘C:\Users\username\AppData\Local\Temp\myproject’) into Job workspace directory(“C:\Users\username.jenkins\jobs\ExampleTest”).
- Go to Build section
- Add build step -> Execute Windows batch command
In the text area field type the command:
1
xcopy /y /s /e "C:\\..WorkingDirectory\\project"Execute tests with “qautorunner.py”:
Add build step -> Execute Windows batch command
In the text area field type the command:
1
qautorunner.py -c ExampleTest -p data\\parameters.xml
Publish the test results:
- Go to Post-build Actions
- Add post-build action -> Publish HTML reports -> Add
In ‘Index page[s]’ column type the path to the html file, in our case type:
1
test_reports/index.html
In Keep past HTML reports column select checkbox
- Add post-build action -> Publish JUnit test result report
In Test report XMLs text box type path to .xml file(s), in our case type:
1
test_reports/TEST-*.xml
- Click Save
Build the project by clicking at Build Now
7.4.2 Jenkins on Linux
Here are basic introductions how to set up Jenkins on Linux. If you want more information about Jenkins, please visit https://wiki.jenkins-ci.org.
On Debian-based distributions (e.g. Ubuntu) install Jenkins through apt-get:
By default, Jenkins listen on port 8080. Access this port with your browser to start configuration (localhost:8080).
Open QAutomate test files, copy wanted test file and paste it to Jenkins job folder, under workspace folder.
Jenkins jobs will be placed by default in /var/lib/jenkins/jobs/project-you-created/workspace
After creating new project and copying QAutomate project under it, set up Jenkins:
sudo nano /etc/default/jenkinsChange username to match your computers name:
Change the ownership of the Jenkins home, Jenkins webroot and logs run commands below using created username:
After changes restart Jenkins:
7.5 IDE
If the user wishes to use an IDE (Integrated Development Environment) for test development we recommend one of the following options
7.5.1 Eclipse
Comes with in a .zip file that needs to be extracted.
We recommend to add PyDev add-on for Eclipse that makes developing Python easier. Instruction on how to get it: http://pydev.org/download.html
Any additional plugins can be installed from IDE itself (Help -> Install new software)
7.5.2 Aptana
Comes with an .exe installer file On Aptana Studio, PyDev is installed by default. For integrated Git support we recommend EGit add-on
- Download Aptana Studio installer: http://www.aptana.com/products/studio3/download
- Double-click on the installer and leave all installation options on default
- Open Aptana Studio 3
- Open File menu
- Select New
- Select Project
- In “Select a wizard” view select PyDev -> PyDev Project -> Press Next
- In “PyDev Project” enter the name for the project, e.g. “TestCaseDev”
- Check that Grammar Version is set to 2.7
- Click on the link “Please configure an interpreter..” to configure which Python version IDE should use
- In the tree select “Interpreter - Python”
- In te upper box press “New..” button
- Give a name to the interpreter, e.g. “Python2.7”
- Click “browse”, find and select Python.exe (C:/Python2.7)
- Press OK
- In “Selection needed” view leave all the options on default and hit OK
- Press OK to save changes and wait until they are applied
- Press Finish to finalize the project creation
- Press OK when prompted to open PyDev perspective
Any additional plugins can be installed from IDE itself (Help -> Install new software)
8 Appendices
8.1 Hotkeys
QAutomate has following Designer hotkeys:
- Ctrl + double click method in editor -> navigate to selected method
- Ctrl + shift + double click method in editor -> navigate to selected parameters
- Ctrl + q -> open insert method window
- Ctrl + w -> add new method/parameter or insert existing method
- Ctrl + e -> execute test run
- Ctrl + r -> execute debug run
- Ctrl + a -> select all content from selected view
- Ctrl + s -> save and stop editing selected view
- Ctrl + d -> copy and paste selected line to next line
- Ctrl + f -> set cursor to search window
- Ctrl + space -> navigate to selected method in correct method view


